How to Integrate PySpark with Jupyter Notebook
Learn how to integrate Apache-Spark with Jupyter Notebook from zero in 9 easy tested and tried steps


This is how to integrate PySpark with Jupyter notebook, the instructions are written for macOS terminal. Pro tip: translate any instructions to your operating system command line by asking ChatGPT.
Follow these 9 easy steps:
1) Install Python through Anaconda at: https://www.anaconda.com/download#downloads.
*Choose the correct installation based on your operating system
2) Open the Terminal (go to: Application/Other/Terminal)
3) Install Homebrew by running the following command in the Terminal:
/bin/bash -c "$(curl -fsSL https://raw.githubusercontent.com/Homebrew/install/HEAD/install.sh)"
Homebrew is a popular package manager for macOS, which allows users to easily install and manage software packages on their Mac computers. It simplifies the process of installing open-source software and other tools by automating the necessary steps, such as downloading, compiling, and linking the software.
It's worth noting that Homebrew is specific to macOS and is not compatible with other operating systems like Windows or Linux. For those systems, alternative package managers, such as APT or YUM on Linux, or Chocolatey on Windows, are commonly used.

4) Install Apache-Spark using Homebrew with the following command in the Terminal:
brew install apache-sparkApache-Spark needs Java jdk to run, by installing with Homebrew the dependency will be solved automatically and jdk@17 will be installed to Homebrew/Cellar directory together with Apache-Spark.
Apache Spark is an open-source, distributed computing system designed for big data processing and analytics. It provides a unified framework for processing large-scale data across clusters with speed and efficiency. The advantages of using Spark include its ability to handle diverse data sources and workloads, support for real-time stream processing, and its rich set of built-in libraries for machine learning, graph processing, and more.
5) Create a python environment for Spark to run in Anaconda with the following code:
conda create --name pyspark_env python=3.10.11Choose the python version you prefer or don't include this part of the code for the default version. And feel free to name the environment however you like - instead of pyspark_env enter a different name.
6) Install Jupyter Notebook in the new environment:
First we need to activate the environment:
conda activate pyspark_envNow, let's install the notebook: press "y" when the Terminal prompts "y/[n]"
conda install jupyter notebook
Make sure the installations proceed successfully.
7) Install findspark, this package will help as locate and launch the spark shell through jupyter notebook later on.
conda install -c conda-forge pyspark
8) Set the global variables SPARK_HOME and PYTHONPATH to the installation location of APACHE-SPARK.
- Enter the following code into the Terminal, it will open the nano text editor:
nano ~/.bash_profile- Inside the text editor add the following lines at the top of the file:
# Set SPARK_HOME
export SPARK_HOME=/opt/homebrew/Cellar/apache-spark/3.4.1/libexec

# Add Spark Python directories to PYTHONPATH
export PYTHONPATH=$PYTHONPATH:$SPARK_HOME/python:$SPARK_HOME/python/lib/py4j-0.10.9.7-src.zip

# Remove duplicates from PYTHONPATH
PYTHONPATH=$(python -c "import os;
print(os.pathsep.join(set(os.environ['PYTHONPATH'].split(os.pathsep))))")

# Update PATH to include Spark binaries
export PATH=$SPARK_HOME/bin:$PATH
This code sets the SPARK_HOME to point at the pyspark.sh file location that will allow juyter to launch it and PYTHONPATH to point at the py4j package that is required to run Spark.
Make sure the directories and versions are correct for you: If not adjust by going to /opt/homebrew/Cellar/apache-spark and look for the correct versions and directories :
- After entering these lines press ^o, then press Enter to write to the file, press ^x to exit the editor.
- Run the following code to update the variables:
source ~/.bash_profileThe output should be empty.
- Run the following code to make sure everything was updated correctly:
echo $SPARK_HOME
echo $PYTHONPATH
The output should match the directories you entered to the bash_profile.
9) Launch Jupyter notebook from the pyspark_env and check that the integration works:
conda activate pyspark_envjupyter notebookAfter running these 2 commands Jupter Notebook should launch into your browser running on local host.
- Navigate to your desired folder and open a new Notebook
- Enter the following code to a cell in the notebook:
# help python find pyspark
import findspark
findspark.init()
# import modules from pyspark
from pyspark.sql import SparkSession
from pyspark.sql.types import *
from pyspark.sql.functions import *
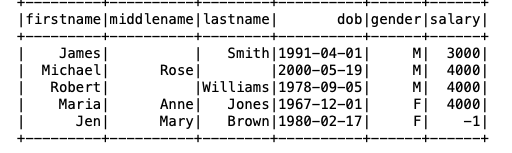
# Create some fake data to create a Spark dataframe
data = [('James','','Smith','1991-04-01','M',3000),
('Michael','Rose','','2000-05-19','M',4000),
('Robert','','Williams','1978-09-05','M',4000),
('Maria','Anne','Jones','1967-12-01','F',4000),
('Jen','Mary','Brown','1980-02-17','F',-1)
]
columns = ["firstname","middlename","lastname","dob","gender","salary"]
df = spark.createDataFrame(data=data, schema = columns)
df.show()
Example taken from https://sparkbyexamples.com/pyspark-tutorial/
Summary:
1) Install Python through Anaconda
2) Open the Terminal (go to: Application/Other/Terminal)
3) Install Homebrew
4) Install Apache-Spark using Homebrew
5) Create a python environment for Spark
6) Install Jupyter Notebook
7) Install findspark
8) Set the global variables SPARK_HOME and PYTHONPATH
9) Check that the integration works